Tag Archive for: landscaping tips

Winter Tree Pruning: 5 Steps Arborists Take to Prepare Trees for Spring

While trees appear still during late winter, their structure and future growth are already set. The way branches are shaped, supported, or stressed now directly affects how a tree responds when spring growth begins.

With foliage gone, a tree’s framework is fully visible, and the dormant season allows pruning work to be done with minimal stress to the tree. This makes it easier to identify weak, damaged, or poorly positioned branches and address potential safety concerns before outdoor spaces become active again.

Pruning is not simply a cosmetic task; it influences how a tree grows and performs over time. Proper winter tree pruning requires an understanding of tree biology, growth habits, and safety practices. When handled by trained professionals, it prepares trees for a stronger, healthier growing season ahead.

Why Late Winter Is Ideal For Tree Pruning

Winter Tree Care Services

Late winter offers conditions that make pruning both more effective for the tree and safer for the surrounding property. With trees dormant, they are better able to tolerate pruning without the stress associated with active growth.

During dormancy, energy is stored rather than spent on producing leaves or new shoots. Pruning at this stage keeps cuts clean and stable until warmer temperatures arrive, when the tree can naturally seal wounds and direct growth where it is needed most.

The absence of leaves also gives arborists a clear view of the tree’s structure. Crossing branches, weak attachments, and hidden imbalances that emerge during the growing season are easier to identify and correct. This enables precise, intentional cuts that improve strength and form, rather than reactive trimming later in the year.

Late winter timing can also reduce the risk of spreading certain insects and diseases that are more active during warmer months. Pruning during dormancy helps limit exposure during a season when fresh cuts are less vulnerable.

Together, these factors make late winter one of the most effective times to evaluate and prune trees with long-term health, safety, and appearance in mind.

5 Key Steps Arborists Take in Late Winter Pruning

Understanding why late winter is the right time to prune is only part of the equation. How pruning is approached matters just as much.

Professional arborists approach late winter tree pruning as a deliberate process, making intentional decisions that support a tree’s health, structure, and safety while preparing it for the growing season and long-term performance.

Step 1: Arborist Assessment and Diagnosis

Late winter tree pruning begins with a thorough assessment of the tree. Before any cuts are made, arborists evaluate the tree’s species, age, overall health, and growing environment to understand how it has developed and what challenges it may be facing.

An Arborist assessment typically includes:

  • Signs of past storm damage, decay, or structural weakness
  • Branching patterns that may lead to poor structure or future failure
  • Stress caused by site conditions such as soil, spacing, or competition
  • Proximity to homes, driveways, walkways, and other landscape features
  • Clearance or safety concerns that may need to be addressed before spring

By starting with a full diagnosis, arborists can determine which branches should be removed, reduced, or left alone. This upfront evaluation ensures pruning decisions are purposeful and aligned with the tree’s long-term health rather than reactive or purely cosmetic.

Step 2: Arborists Address Immediate Hazards

Once the initial assessment is complete, arborists focus on branches that pose an immediate risk. Late winter is an effective time to remove dead, cracked, or hanging limbs before changing temperatures and spring storms increase the chance of branches breaking or falling.

This step often prioritizes branches located over homes, driveways, walkways, patios, and other high-use areas. Removing these hazards early helps reduce the risk of injury or property damage and allows the tree’s remaining structure to be evaluated and pruned more effectively.

Step 3: Arborists Improve Tree Structure

With immediate hazards addressed, arborists focus on improving the tree’s overall structure. This involves identifying branches that cross, rub, or compete with one another, as well as areas where weak attachments or poor growth patterns could lead to problems over time.

Rather than simply shortening branches, arborists make targeted cuts that encourage strong, balanced growth. The goal is to guide the tree’s development as it matures, creating a framework that better supports leaves, withstands weather, and maintains a natural appearance.

Step 4: Arborists Thin and Balance the Canopy

After structural concerns are addressed, arborists focus on the tree’s canopy. Thinning crowded areas allows light and air to move more freely through the branches, which supports healthier growth as the tree enters the active growing season.

Canopy work is done selectively and with restraint. Arborists remove or reduce branches in a way that maintains the tree’s natural shape while preventing it from becoming overly dense or unbalanced. The goal is not to drastically change the tree’s appearance, but to help it perform better within the space it occupies.

By carefully thinning and balancing the canopy, arborists help trees leaf out more evenly in spring and reduce stress caused by overcrowding or uneven growth.

Step 5: Arborists Work Safely and Leave a Finished Result

Late winter pruning often involves working at height and around homes, utilities, and other landscape features. Arborists use professional equipment, climbing techniques, and safety practices to protect the tree, the property, and everyone on site throughout the process.

Once pruning is complete, crews remove debris and review the finished result to ensure the tree’s structure, clearances, and overall appearance align with long-term health goals. The focus is on leaving the tree stable, balanced, and ready for the growing season ahead.

A thorough finish ensures that pruning work supports both the tree’s future growth and the homeowner’s expectations, without the need for additional corrective work once spring arrives.

When Homeowners Should Call a Professional Arborist

While regular tree care is part of maintaining a healthy landscape, certain situations call for professional evaluation and pruning. Late winter is a perfect time for homeowners to take a closer look before spring activity begins.

Homeowners should consider calling a professional when they notice:

  • Hanging, cracked, or damaged branches
  • Limbs extending over roofs, driveways, walkways, or outdoor living areas
  • Trees that appear misshapen, unbalanced, or stressed after winter weather
  • Mature trees near patios, play spaces, property lines, or high-use areas
  • Trees that have not been professionally evaluated in several years

For homeowners planning spring projects or increased outdoor use, professional tree care can help avoid unexpected issues. Late-winter attention helps create safer, more functional outdoor spaces as the season changes.

Why Partner with American Landscape

Late winter tree pruning is an investment in the long-term health, safety, and appearance of your landscape. Working with experienced professionals ensures pruning decisions are based on the tree’s needs, the surrounding environment, and how the property is used throughout the year.

American Landscape’s tree care team includes trained arborists who can evaluate structure, identify risks, and apply proper dormant-season pruning techniques. From individual tree assessments to ongoing tree health programs, services are designed to support strong growth, reduce future issues, and protect the value of your landscape.

Contact American Landscape to schedule a late winter tree assessment and prepare your landscape for a healthy, safe spring.

Fall and Winter Care Tips For New Landscapes

A new landscape is an exciting investment—but the first winter is often the biggest test. While we carefully select plants we believe will thrive, young trees, shrubs, and perennials still need a little extra care to make it through the colder months successfully. With some proactive steps, you can protect your investment and set the stage for a strong, healthy spring.

Protecting Young Deciduous Trees

Protect trees and shrubs
Deer may not always eat young deciduous trees, but they do love rubbing antlers on tender bark in the fall. Damage often begins as early as September. Protect your trees by:

  • Paper Tree Wrap: Wrap trunks from the ground to the lower branches, then remove in March to avoid trapped moisture or pests.

  • Plastic Tree Wrap: Choose ventilated options and remove in spring. Avoid DIY black drain tile, which traps heat and can cause frost cracks.

  • Caging: Build a hardware cloth fence several feet from the trunk and bury the base to block deer and rodents. This also works for shrubs.

Safeguarding Arborvitae

Most arborvitae are irresistible to deer. To protect them:

  • Deer Sprays: Apply multiple times in fall before freezing temps set in.

  • Burlap: Wrap trees directly or create a burlap fence with stakes for better airflow and easier spring removal.

Caring for Perennials

Black eyed Susan

You may have heard the old adage, “Sleep, creep and leap,” in regards to perennials.  The first year they sleep – all the activity is going on underground where they are developing new root systems. Help them establish by:

  • Watering during warm, dry fall stretches (only if soil is dry).

  • Adding 2–3 inches of mulch to stabilize soil temperature.

  • Deciding whether to cut back in fall or leave stems for winter interest and wildlife habitat.

Protecting Shrubs

Some shrubs are more vulnerable to animal damage. Tips include:

  • Roses: Modern landscape varieties don’t need covering—just mulch and moisture until freeze.

  • Rabbit-prone shrubs (burning bush, barberry, serviceberry, etc.): Use sprays or cages for protection.

  • Junipers: Watch for vole damage; prune out affected branches in spring.

  • Rhododendrons & Azaleas: Use burlap fencing or anti-desiccant sprays to prevent winter burn.

Winter can be tough on new landscapes, but a little preparation goes a long way. By protecting young trees, safeguarding evergreens, watering and mulching perennials, and guarding vulnerable shrubs, you’ll give your landscape the best chance to thrive. Come spring, you’ll be rewarded with strong, healthy growth that continues to build the outdoor space you envisioned.

Our team can help work with you to ensure your new landscape has the best chance of survival over winter. Get in touch today for assistance.

Tips to Keep Your Landscape Thriving in August

ConeflowerFlower Care

  • Fertilize container plantings.
  • Deadhead flowers to encourage additional blooming.
  • Monitor for disease and insect problems and treat as needed.
  • Remove any slug-eaten leaves from hostas.
  • Cut back daylilies to 3-4″ to stimulate regrowth.
  • Check rhizomes for iris borer caterpillars.
  • Do not fertilize shrubs or roses after mid-August to discourage tender new growth before winter.

Pro Advice: Clear leaf debris from gardens to prevent breeding grounds for insects and fungal diseases!

Lawn mowing and trimmingLawn Maintenance

  • Mow as necessary. Raise mowing height to at least 3” as temperatures exceed 85˚F.
  • Water lawn adequately to keep it from going dormant. Deep (1” per week) and infrequent is preferred over frequent shallow waterings.
  • Scout for grubs. Peel back sod. More than 8 grubs per square foot can cause wilt or death of turf.
  • Establish or renovate turf by seed (late summer – early fall, depending on weather conditions). Prepare soil properly and get good seed to soil contact.

Tree Care by American Landscape Arborists

Trees & Shrub Care

  • Water newly planted trees and shrubs. Soak each plant well with the hose; sprinklers do not provide adequate water to encourage deep root growth.
  • Scout for fall webworm nest building near ends of branches.
  • Review health of trees and consider fall root feeding if necessary.

Tip! Don’t let weeds go to seed. “A year of seeding equals 7 years weeding.”

If keeping up with your landscaping chores feels overwhelming, reach out to learn more about our maintenance programs. (262) 252-4260

Raised Garden Beds vs. In-Ground Planting: Which Works Best for Your Space?

Each year, as Elm Grove prepares for its Fourth of July fireworks, cars wind through quiet neighborhoods on the way to the park. Along the route, something else stands out — the gardens. By early summer, they seem to have transformed overnight.

What was bare soil in May is now full of color and texture: tomato vines climbing trellises, herbs nestled in raised beds, and wildflowers softening backyard fences. Every yard offers its own version of what it means to grow something well.

Some homeowners prefer the structure and simplicity of raised beds. Others work directly with the land, planting into the soil that’s been there for generations. Across southeastern Wisconsin, both methods have earned a place in local landscapes for good reason.

If you’re planning a new garden or expanding what you already have, your layout matters. It influences how your garden functions, what you can grow, and how much you’ll enjoy spending time in it.

What’s the Difference Between Raised Garden Beds and In-Ground Planting?

When planning a garden, one of the first decisions to make is how you’ll grow your plants. Two of the most popular methods are raised garden beds and in-ground planting. Each offers unique benefits and challenges, and the right choice depends on your space, goals, and soil conditions.

Let’s take a closer look at how each method works.

Raised Garden Beds Explained

Raised garden beds are freestanding structures built above ground level. Gardeners typically fill them with high-quality soil blends that match their planting needs.

These beds are often built with:

  • Natural wood (such as cedar or redwood): Naturally rot-resistant and affordable, making it a popular DIY option.
  • Galvanized metal panels: Extremely durable and long lasting, with a modern look that resists rot and pests
  • Recycled composite boards: Made from recycled materials and designed to resist warping, cracking, and rot over time.
  • Stone or masonry edging: Heavy-duty and permanent, offering a classic look and excellent insulation for soil.

Raised beds give you more control over:

  • Soil composition and drainage
  • Weed management
  • Garden layout and spacing

They also improve accessibility, especially for gardeners who prefer not to kneel or bend. Because the soil sits above ground, it warms up faster in spring and dries out more quickly after rain. That makes it easier to manage planting schedules and moisture levels. This method is suitable for gardens with poor or compacted native soil. It also suits small yards, patios, or any space where a tidy, organized layout is preferred.

In-Ground Planting Explained

In-ground planting involves growing directly in the earth without raised borders or imported soil. This traditional method uses the existing soil on your property and typically begins with soil testing and preparation.

Raised vs Inground gardensGround preparation begins with:

  • Tilling to break up compacted soil
  • Adding compost or organic matter to improve texture and fertility
  • Adjusting pH or nutrients based on soil test results

This method supports deep-rooted plants, allowing your garden to follow the natural contours of the landscape. It also works well for large garden beds where raised structures may not be practical.

In-ground planting is a good choice if you:

  • Have access to healthy native soil or are willing to amend it
  • Want to grow crops that require more root depth or horizontal space
  • Prefer a natural look that blends into the surrounding landscape
  • Are planning a larger garden that would be costly to build as raised beds

Although it may involve more physical labor at the start, in-ground planting offers long-term flexibility and room to scale. It remains one of the most cost-effective and traditional approaches to gardening, especially for expansive spaces.

Pros and Cons of Raised Garden Beds

Raised beds support intensive planting styles, such as square-foot gardening, making them ideal for maximizing yields in small spaces.

Loose, well-drained soil allows crops to grow closer together without competing for nutrients.

They also help with pest and disease control. The defined structure contains soil more effectively and makes it easier to install protective barriers, such as mesh or row covers.

On the downside, raised beds come with higher upfront costs due to the materials and construction required. They’re also harder to expand or move once installed.

In hot, dry weather, raised beds may require more frequent watering since they can lose moisture from all sides.

Pros and Cons of In-Ground Gardening

In-ground gardens offer long-term flexibility with minimal structural upkeep. There’s no need to maintain frames, and you can expand planting areas as your garden grows.

This method also supports a healthy ecosystem. Native microbes, earthworms, and beneficial fungi thrive in undisturbed soil, helping to improve long-term soil health and biodiversity.

However, in-ground beds can suffer from compaction, especially in clay-heavy soils or high-traffic areas. Poor drainage may lead to stunted growth or root issues if the soil isn’t well-maintained.

Weed control is also more demanding. Even with mulching and regular care, native soil tends to produce more persistent weed growth than contained raised beds.

Best Plants for Raised Beds and In-Ground Gardens

Wisconsin’s short growing season, cool spring temperatures, and varied soil conditions make it especially important to choose the right plants for your garden type.

Some crops grow best in the controlled soil of raised beds, while others thrive in the open layout of an in-ground plot.

Best Plants for Raised Beds

Spiritual Garden Sanctuary - Raised Garden Beds
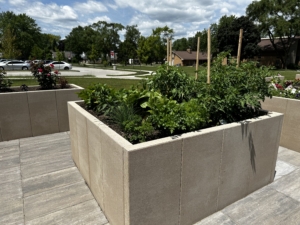
Raised beds warm quickly in spring and offer excellent drainage, which benefits crops that prefer consistent moisture and nutrient-rich soil.

Recommended plants for Wisconsin raised beds include:

  • Leafy greens: lettuce, spinach, Swiss chard, arugula
  • Cool-season herbs: parsley, cilantro, dill, thyme
  • Compact root vegetables: radishes, beets, turnips, green onions
  • Warm-season vegetables (with proper spacing and support): cherry tomatoes, bell peppers, bush beans
  • Fruits: strawberries (especially June-bearing or everbearing varieties suited for the region)

These crops respond well to the loose, amended soil and predictable watering conditions raised beds can provide, especially in early or late parts of the growing season.

Best Plants for In-Ground Gardens

In-ground beds are ideal for larger plants or crops that require more space to spread out or develop deep roots. Wisconsin’s well-drained loam and clay-loam soils work well for many staple crops once properly amended.

Ornamental grasses for landscaping privacyRecommended plants for Wisconsin in-ground gardens include:

  • Large vegetables: sweet corn, potatoes, pumpkins, squash
  • Sprawling vines: cucumbers, melons (especially Minnesota Midget or other short-season types)
  • Storage crops (crops that store well for weeks/months without losing quality): cabbage, carrots, rutabaga
  • Perennials and ornamentals: rhubarb, asparagus, daylilies, native grasses

These plants benefit from the extra space and deeper rooting potential that in-ground planting allows. Many of them also tolerate the heavier soil types found throughout much of the state.

Choosing the Best Garden Type for Your Landscape

The right garden style depends on your goals, available space, and level of commitment.

Raised beds are well-suited for smaller spaces, modern layouts, and gardeners who want more control over their soil and structure. They’re an excellent choice for intensive planting and easy maintenance.

In-ground gardens are better suited for larger spaces, deep-rooted or sprawling crops, and those who are comfortable with ongoing soil management. They offer flexibility and long-term scalability.

Some homeowners even combine both methods to strike a balance between productivity, aesthetics, and cost.

Choose the Garden That’s Right for Your Needs with Help from American Landscape

Every yard is different, and your garden should reflect that. Whether you prefer the structure of raised beds or the openness of in-ground planting,

Contact us today to schedule a consultation and start building your ideal garden.

Small Backyard Landscaping Ideas to Maximize Space & Beauty

A small backyard doesn’t have to feel limiting. With the right design choices, it’s an opportunity to create a functional and beautiful outdoor retreat.

Whether you’re looking for a low-maintenance oasis, a cozy entertainment space, or a lush green escape, landscaping strategically can maximize every inch of your yard.

By incorporating smart layouts, vertical gardens, space-saving furniture, and natural elements, you can transform even the smallest outdoor space into a stylish and practical extension of your home.

In this guide, we’ll explore six creative and budget-friendly landscaping ideas to help you make the most of your small backyard—without compromising beauty or functionality.

6 Small Backyard Landscaping Ideas

Sophia loved the idea of having an outdoor space to enjoy, but her backyard never quite felt like one. It was small, uneven, and lacked the cozy charm she imagined when she thought of an inviting retreat. She wanted a space that felt intentional—a spot to unwind, read a book, or gather with friends. But every time she looked at it, she felt stuck.

If you’ve ever felt the same way, don’t worry—you don’t need acres of land to create a beautiful outdoor escape. Here are six small backyard landscaping ideas that can transform even the tiniest spaces into a personal oasis.

1. Design a Smart Layout to Make the Most of Your Space

Alpine Landscaping Style

A small backyard can feel bigger and more functional with the right layout. Instead of treating your yard as one open space, divide it into zones for different activities—like dining, gardening, and lounging.

  • Use angled pathways or curved borders to create flow and make the space feel larger.
  • Incorporate built-in features like seating with storage or raised planters to maximize every inch.
  • Keep sightlines open by using low-profile furniture and strategic plant placement, helping the space feel open rather than crowded.

By designing purposefully and efficiently, even the smallest backyard can feel expansive and well-organized.

2. Incorporate Lush Greenery with Vertical & Container Gardening

When ground space is limited, go up! Vertical gardens and container gardening let you add lush greenery without sacrificing room for seating or entertainment.

  • Install trellises, wall planters, or hanging baskets to bring greenery to vertical surfaces.
  • Try a DIY pallet planter for an affordable, space-saving way to grow herbs, flowers, or succulents.
  • Use containers in varying heights to create dimension—grouping plants together makes a small space feel more intentional and designed.

With the right approach, you can enjoy a vibrant, plant-filled backyard without losing valuable space.

3. Replace Grass with a Low-Maintenance Oasis

Traditional lawns require upkeep, and in a small backyard, they often aren’t the best use of space. Instead, consider low-maintenance alternatives that look beautiful year-round.

  • Swap grass for gravel, pavers, or decking to reduce upkeep and create a polished look.
  • Try ground covers like creeping thyme or clover for a softer, natural alternative to turf.
  • Create a rock garden with drought-resistant plants for a modern, eco-friendly design that requires little watering.

Ditching grass doesn’t mean sacrificing style—these options provide a chic, practical solution for small backyards.

4. Create Multi-Functional Outdoor Living & Entertainment Spaces

Paver Seating Area

Your backyard should be more than just decorative—it should work for your lifestyle. Designing a versatile outdoor space ensures you get the most out of your yard.

  • Choose space-saving furniture: Folding chairs, stackable stools, or modular seating keep things flexible.
  • Incorporate built-in seating: Benches with hidden storage make a small space functional and clutter-free.
  • Add ambiance with lighting and fire features: String lights, lanterns, and a compact fire pit or tabletop fire bowl make even a small yard feel warm and inviting.

A thoughtfully designed entertainment space helps you enjoy your backyard—whether it’s for relaxing, hosting guests, or dining outdoors.

5. Incorporate Natural Elements with Hardscaping & Water Features

Balance structured elements like patios and pathways with natural touches to create a harmonious, visually appealing landscape.

  • Use stone pathways or gravel patios to define spaces while maintaining a natural feel.
  • Add a small water feature—a wall-mounted fountain, recirculating mini pond, or DIY bubbling pot brings soothing sounds without taking up space.
  • Blend hard and soft landscaping by pairing pavers with ornamental grasses, native plants, or decorative rocks.

Combining earthy textures and flowing water creates a serene, balanced outdoor space that feels structured and organic.

6. Keep Landscaping Simple & Low-Maintenance

Wild ColumbineThe best small backyards are easy to care for without constant upkeep. Choosing the right plants and materials can save time while keeping your space beautiful and inviting.

  • Opt for native or drought-resistant plants that thrive with minimal watering.
  • Use mulch or decorative gravel to reduce weeds and maintain soil moisture.
  • Limit high-maintenance features—instead, go for durable, long-lasting materials like composite decking or stone pavers.

By focusing on low-maintenance solutions, you can spend less time on upkeep and more time enjoying your backyard.

Make the Most of Your Small Backyard Landscaping with American Landscape

A small backyard doesn’t mean sacrificing style or function—with the right design, it can become a relaxing retreat, an entertainment hub, or a lush green escape. By incorporating smart layouts, vertical gardens, multi-use features, and natural elements, you can maximize space and create an outdoor area that fits your needs.

At American Landscape, we specialize in transforming outdoor spaces of all sizes. Whether you’re looking for low-maintenance solutions, custom hardscaping, or a complete backyard redesign, our team can bring your vision to life.

Ready to upgrade your small backyard?

June Landscaping Checklist

June landscaping calls for paying attention to the watering and fertilizing needs of every element – flowers, trees/shrubs, and lawns. Be sure to review the complete June landscaping checklist to stay on top of the tasks needed in June to ensure your landscaping thrives all summer long.

Flowers

  • Continue planting annuals and vegetables.
  • Direct seed annuals and vegetables into the garden early in the month.
  • WATER! Annuals and veggies need regular water due to their shallow root systems. Remember that fewer, deeper waterings are more beneficial than frequent, shallow waterings.
  • Fertilize as needed. Perennial beds can use a slow-release fertilizer or can be fed along with annuals with a liquid like Miracle Gro. Vegetables can also be treated this way although many people have moved towards organic methods like compost to enrich the soil in the vegetable gardens.
  • Deadhead annuals and perennials for enhanced appearance and improved blooming.
  • Stake or trellis newly planted things like vines and tomatoes right away to avoid damaging the plant later.
  • Get on a regular weeding schedule. It’s easier to keep up a little at a time than to let things get out of control.

Lawn

  • Apply fertilizer and broadleaf weed control. 4-6 weeks after your prior application is best. Avoid using weed control on newly seeded areas.
  • Monitor for disease and insect problems and consult a professional if needed.
  • Keep grass cut at about 2 ½” to 3”. Cutting the grass shorter will allow more heat and light to penetrate to the roots causing stress. It also creates more openings for weeds to take hold.
  • Water as needed. Remember that fewer, deeper waterings will be more beneficial than frequent, shallow waterings. Lawns require about an inch of rain per week.
  • Newly seeded or sodded areas will require more water than an established lawn.

Trees/Shrubs  

  • Monitor for disease and insect problems and consult a professional if needed.
  • Prune spring blooming shrubs right after they are done blooming.
  • Trim boxwood, yews and other evergreens.
  • Fertilize roses and pre-treat with fungicide if they are prone to disease issues.
  • Trees and shrubs planted within the last year should be monitored for water. They will need it before your established plants do. If it’s hot and dry and we’re receiving less than an inch of rain per week, give them a good long drink.

Download Checklist

Want to stay in the loop?
Sign up for our newsletter.

"*" indicates required fields

This field is for validation purposes and should be left unchanged.
Name*

American Landscape - 50 Years of Outstanding Landscaping Service to the Greater Milwaukee Area

(262)252-4260
info@amerlandscape.com

N60 W16073 Kohler Ln,
Menomonee Falls, WI 53051