Spotting and Treating Turf Damage from Winter

Is that grass I spy finally emerging? We’ve had some heavy snowfall this winter! Because of the thick snow cover we’ve had this season, many of you will probably look out one day and see damaged areas in your turf. Let’s address some of the things that may be the culprit:

Moles and voles:  These will look like little trails through your lawn.  The animals burrow right under the soil surface and move through your yard.

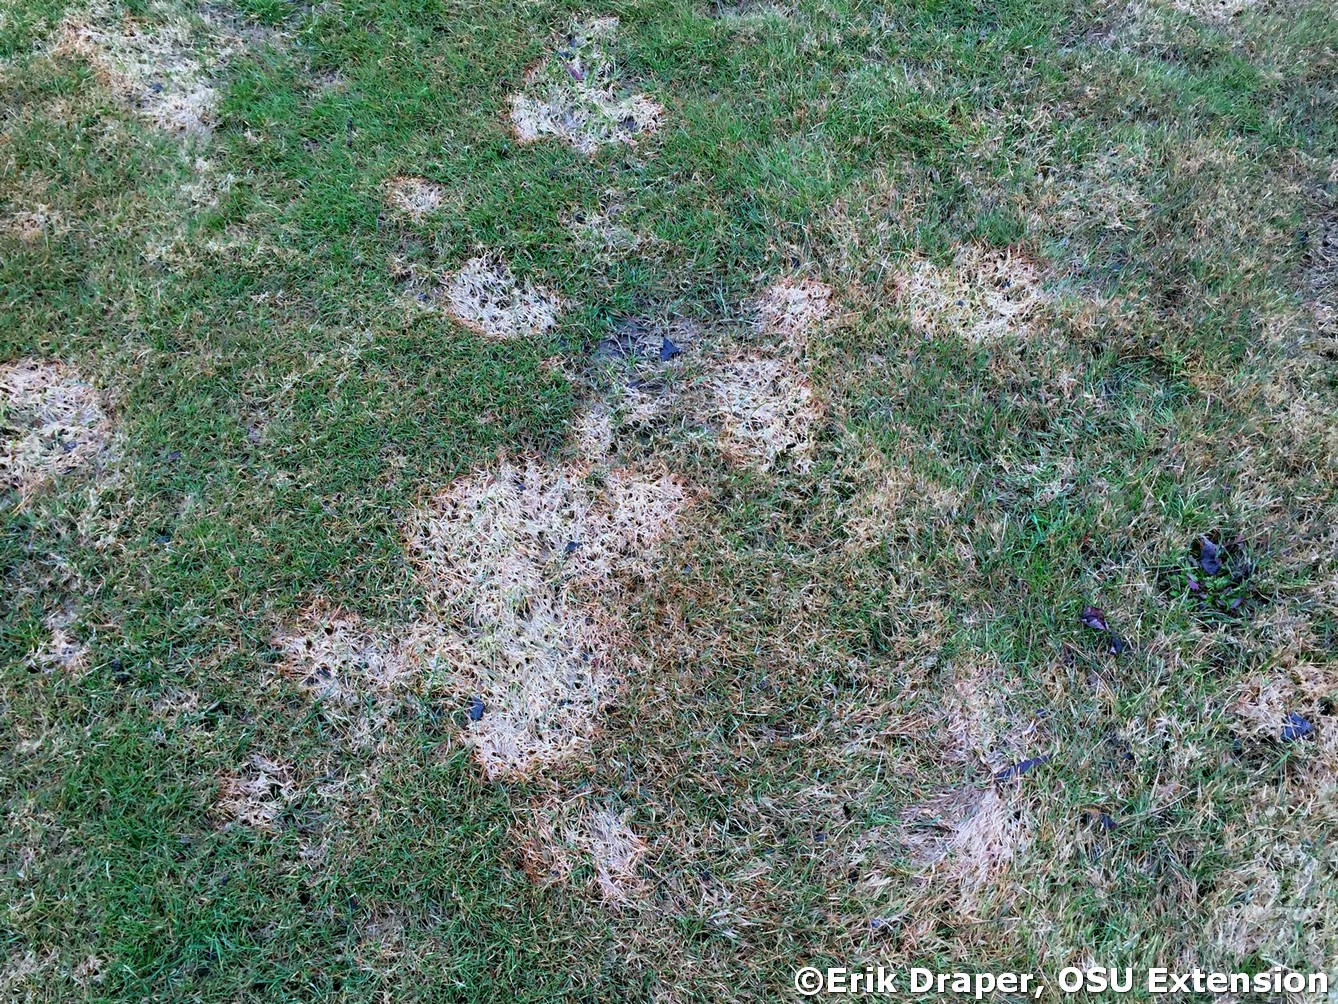
Snow Mold:  This is a fungal issue and will manifest as 2’-3’ large bleached out looking areas in your turf.  

Salt and plow damage.  These are obvious reminders of what we endured over the winter and are found along the edges of driveways and walkways or where snow piles containing salt have been sitting. Turf may also be torn up from plows or snow blowers, or it may be brown and dead from excessive salt.

Restoring Damaged Turf

Now the good news! Turf is tough and generally easy to restore. In most cases raking out the dead areas and allowing nature to take its course is enough, although with plow damage, you do want to replace any divots to allow the turf to root back in.  As the weather warms and grass starts growing, these areas will repair themselves.  A light over-seeding after raking can also be beneficial.

In more severe cases you may want to add topsoil and do a more thorough patching with seed and straw, straw mat, or Penn Mulch.  Make sure to wait until the ground is warm enough to do your seeding in the spring.  For best results, daytime temperatures should be at least in the 60’s for a period of time before you put down new seed.  

Preventative Measures to Take in Fall

While there is no guaranteed prevention against damage each year, you can mitigate damage in the fall by doing a few things:

  • Contact a pest control specialist regarding moles and voles in your yard and follow their recommendations.
  • Use plow markers to indicate the edges of your driveways and walks.
  • Use ice melt products in moderation per manufacturer’s instructions.

Unfortunately, there isn’t much you can do about snow mold as we can’t control our weather conditions.  Thankfully with a little TLC the turf will recover quickly on its own. If you would like some professional help with your lawn and garden maintenance, get in touch today for a consultation and quote. Call us today! (262) 252-4260.

Before & After: Patio/Fire Pit Installation Despite Cold Temps!

Given the challenging winter conditions we have in Wisconsin, knowing how to complete hardscape installations even as colder temperatures begin is key. We’re sharing a behind-the-scenes look at the installation of a patio, walkway and fire pit for a client that we worked on well into January! The key for this installation was to lay frost blankets down on the work area well before frost and snow hardened the ground. Our team was able to complete almost all the installation and this client will now be top of the schedule for finishing off their project in spring.

You can watch our video of the project as it took shape, or read about the daily progress below.

Patio Installation: Day-by-Day Progress

Day 1
Orange frost blankets were placed weeks before the project was due to begin. Blankets had to be shoveled off, then lifted off the turf.  The area for the patio was then measured out and lines marked for crews to begin.


Day 2
Patio base excavation is completed and installation of the gravel patio base begins, along with the construction of the seat wall using Rosetta products.

Day 3
Building of the wall continues and on the other end of the patio, laying the gravel base is finished up.

Day 4
You can see the project really taking shape! The wall has been completed and Belgard pavers are being installed.

Day 5
The team continues laying pavers. Notice that any areas that are not being worked on are kept covered to protect the ground from freezing.

Day 6
The fire pit, using Rosetta products to match the seat wall is built. Work continues on leveling base and laying pavers.  In preparation for the installation of a pavilion in spring, the team inserts Sonotubes that will be filled with cement to create footings.

Day 7
Time to fill the Sonotubes with concrete! The last of the patio pavers are installed.  The team is careful to keep areas not being worked on covered so the project can keep progressing in the cold temps!

Day 8
Final day of this cold weather patio/firepit/walkway installation! The team used EdgeCrete to keep pavers in place and completed the walkway connecting the patio to the garage. The entire area was then cleaned and covered until work can resume in spring.

Extending the season for hardscape installations is one of the ways we deliver on our commitments to our customers. If you are ready to talk about your own landscaping project, get in touch with one of our talented designers today! (262) 252-4260


3-D Modeling Helps Clients Visualize Their Landscaping Projects

It can be challenging for clients to envision how their finished projects will look. Often, a 2-D line drawing just does not adequately convey the beauty of the landscaping that our designers have meticulously planned. It is a leap of faith for many clients to trust that the lines and circles they see on a drawing will result in the design they are hoping to achieve.

Hurrah! In 2020, we began using a 3-D modeling software program that has been a game-changer in bridging the gap between design vision and reality for our clients. The process starts off with a plat survey as usual. Then, using the 3-D software we can show a perspective view or even do a video walk-through for our clients. We can pull in a wide variety of hardscape and plant material in the design to show clients exactly what they will receive.  

We’ve seen a few immediate benefits to using the 3-D software with clients. Overall satisfaction has increased since by seeing a design with their own eyes, client expectations match what we deliver. Communication is still invaluable, as we always make sure to temper expectations with the understanding that newly installed plants will not be as full and glorious in the first year of installation.

[one_half]

[/one_half]

[one_half_last]

[/one_half_last]

[one_half]

[/one_half]

[one_half_last]

[/one_half_last]

Another benefit we have found is that cost estimates are generated more quickly and with greater accuracy. The software automatically measures the beds, patios, and other hardscapes so we immediately have accurate square footage for materials.

One of our guiding principles is “Continuously evolve. Find new solutions. Do it better.” Adopting this new software to help clients visualize outcomes during the design phase is a perfect example of how we put this principle into practice.

Our talented designers are ready to help you on your next landscaping project. Schedule an appointment and let’s get started! Call (262) 252-4260 or contact us here.

Time to Do Some Fall Landscape Clean Up!

The air has turned chillier, the leaves are changing colors, and it’s time to tackle your fall landscaping chores! Set yourself up for springtime success by doing some fall landscape cleanup. Here are a few items that should be on your “to-do” list.. 

Plant Fall Bulbs

Fall-planted flower bulbs are a great way to add color to your garden come spring, and Midwestern cold winters are perfect for planting them. For the best strategies and tips on planting these bulbs, check out our blog post

Clean Up Your Lawn

The colorful leaves on trees are a telltale sign of fall and colder weather. While they look pretty on the trees and on your lawn when they fall, mulching the leaves helps return nutrients to the soil. If that’s not an option for you, raking the leaves and keeping your lawn clear of debris can prevent your lawn from being smothered and stunting new grass growth. 

Cut Back Perennials 

After the first frost, it’s time to trim your perennials. Cut the tops and stems down to the crown of leaves at the base of each plant. Once you’re done, make sure you rake the beds and dispose of dead plant material so your garden still looks fresh during the winter months. 

Apply Fertilizer and Herbicide 

Fertilize your lawn before the first freeze to ensure it looks its best come warmer weather. Once the weather begins to warm up, the grass will draw on the nutrients. Spraying perennial weeds (dandelions, clover, etc.) before the first freeze as well allows the weeds to take in the herbicide to prevent a weedy garden. Fertilize your trees and shrubs too, since it encourages root growth which leads to fewer dead branches and increased spring growth. 

By following these tips, your landscape will be in much better shape once spring comes around. If you need help tackling these fall landscaping chores, our team of experts is always available to help! 

Wauwatosa Patio and Pergola – Silver Award for Excellence in Landscape Design and Construction

Some of our favorite projects occur in small spaces and this is one of them. There was nothing that this client liked about their backyard, dominated by an 85-year-old Maple that had died from verticillium wilt and needed to be removed. The client’s criteria: 

  • “Our maple died and we need shade”
  • “We need a bigger patio and want to entertain outdoors again”
  • “We need our privacy back” 
  • “We don’t mind doing some yard work, we just don’t want to be a slave to our property” 

The final plan included a replacement fence in the same position, removal of the dying boxwood and replacement of the arborvitae with the more compact “Holmstrup” variety. The existing patio was rebuilt with a pattern “A” bluestone, and the existing the bluestone was re-purposed as an access walk around to the front yard for the neighborhood kids. The new patio includes a custom aluminum Pergola, equipped with a retractable power awning, four infrared heaters and an exterior ceiling fan, all controlled remotely. There is no lawn, and the entire rear yard is converted to a planting bed with a stately Oak, Boxwood hedges, Pachysandra and loads of colorful annuals at ground level and in containers. The lighting and irrigation systems have both been re-designed and replaced.

Before

After

We’d love the opportunity to transform your backyard. Our experts will work with you to create your dream oasis. Contact us to set up a design consultation.

Hartford Farm House – Gold Award for Excellence in Landscape Design & Construction

We’re spotlighting another one of our Wisconsin Landscape Contractors Association’s  gold award winning projects!

This project is sits approximate to a uniquely preserved 1850’s farmhouse for a highly tasteful client. The project criteria: “remove everything, start over,” “we don’t want a straight walkway,” “you must salvage the original brick columns,” “we want to recycle our perennials,” “we want to re-use our lighting fixtures,” “we want the layered look” where you feel like you’re moving from area to area with some feeling of separation between spaces…The largest challenge here was to make significant upgrades while retaining that “old world” look of a farmhouse in the country. 

The existing pavers were removed and sent up north to be re-purposed. While excavating that hardscape, we discovered the garage foundation was still intact and needed to be removed. We abandoned existing hardscape areas and converted those spaces into planting beds, and vise-versa. Many tons of concrete were hauled out and hundreds of square feet of bluestone and moved in. Larger spaded trees were installed for an immediate effect and larger shrubs were planted and existing perennials divided and re-planted as requested. Also, the existing high voltage landscape lighting fixtures were converted into low voltage L.E.D. fixtures.

As you can see from the before and after photos below, the transformation was dramatic and we were glad to be able to deliver all of the clients’ “must-haves.”

Before

After