6 Fire Pit Designs to Extend Your Outdoor Season

As much as we enjoy the family-friendly events of summer, like Lavender Fest here in Menomonee Falls, the hot, sticky weather can leave us dreaming of crisp evenings and cooler days ahead.

Soon enough, the humidity will give way to that first refreshing breeze of autumn. Picture yourself on the patio, enjoying the fading light as the air finally cools, and imagining how to make nights like this last longer.

That’s where a cozy fire pit comes in. With the soft crackle of flames and the warm glow casting light across the yard, it transforms a simple evening into something memorable.

Whether you prefer the ease of a portable setup or the beauty of a custom-built feature, the right fire pit makes your backyard the place everyone wants to gather, long after the summer heat has passed.

Covered Fire Pit

Why Add a Fire Pit to Your Outdoor Living Space?

Aesthetics aside, a fire pit has a way of drawing people in.

It naturally becomes the place where conversations linger, where friends gather a little closer, and where you can unwind after a long day. Beyond the atmosphere it creates, a well-planned fire pit adds function and value to your property.

A well-planned fire pit can anchor your backyard design, define a seating area, and make your outdoor space usable well into the cooler months.

When integrated thoughtfully into your overall landscape, it’s more than just an accessory — it’s an investment in both the beauty and the livability of your home.

Integrate Fire Pits into Your Hardscape Design-Build Plan

The best fire pit designs are those that feel like they belong, seamlessly integrated into your outdoor living space rather than added as an afterthought.

Planning your fire pit as part of a complete hardscape design-build project ensures it blends seamlessly with patios, seating walls, or even built-in fireplaces for a cohesive, upscale appearance.

Choosing materials like pavers, natural stone, and accent lighting ensures that your built-in fire pit not only complements your home’s style but also withstands Wisconsin’s changing seasons.

With a design-build approach, every detail from size and placement to finish and features is tailored to your lifestyle, so your fire feature feels like it has always been part of the plan.

6 Fire Pit Designs That Turn Up the Heat on Outdoor Living

There’s a wide range of fire pit designs that can enhance your outdoor living space. The best choice comes down to your style, space, and how you plan to use it.

Here are six options that combine warmth, function, and lasting appeal.

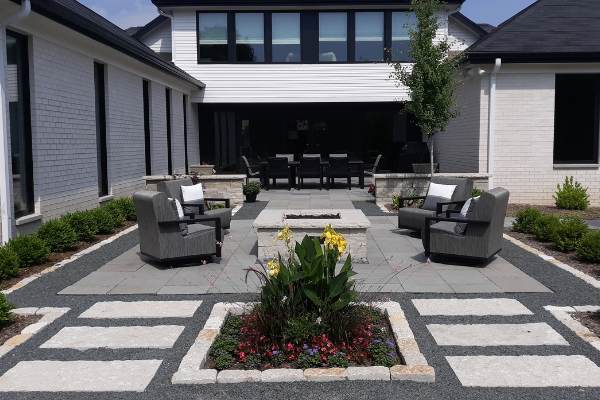
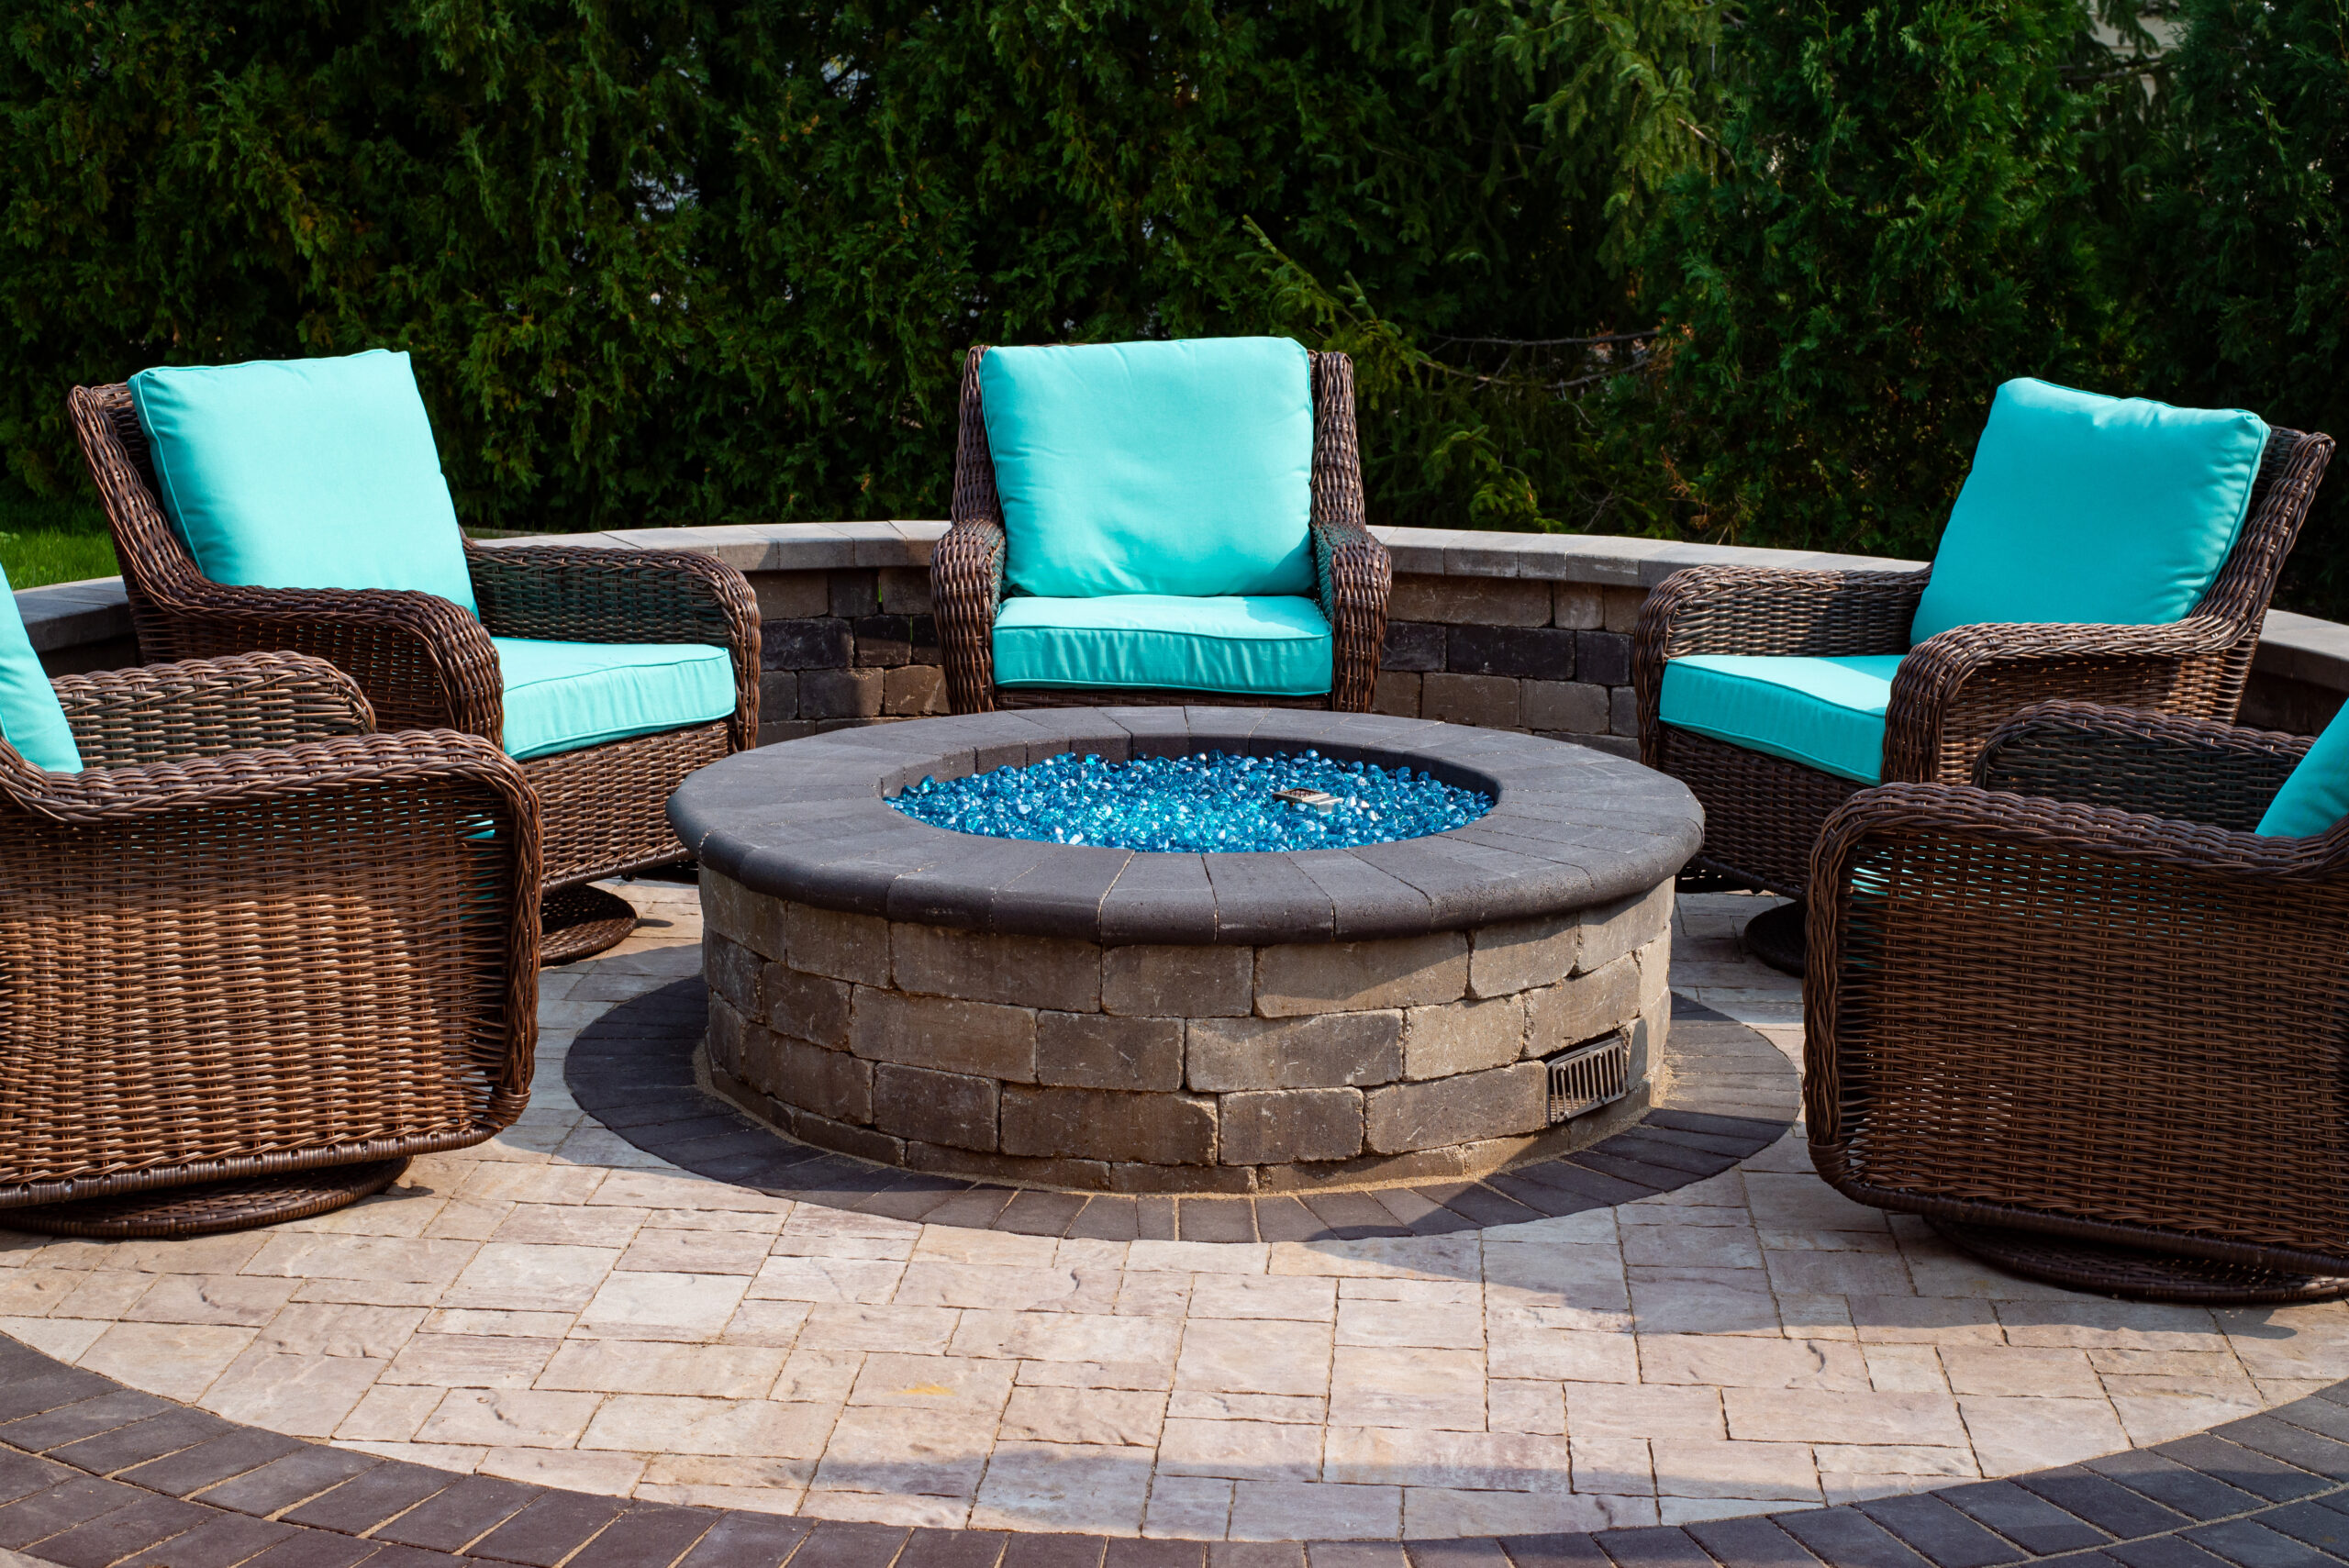
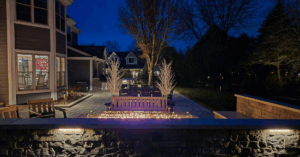
1. Built-In Stone Fire Pits

A built-in fire pit made from natural stone offers a timeless look that blends beautifully with any outdoor living space. This style is perfect for homeowners who want a permanent feature that integrates seamlessly with patios, seating walls, or other hardscape design-build elements.

Stone is both durable and weather-resistant, making it ideal for Wisconsin’s year-round conditions. With endless options for shape, size, and stone type, you can create a custom look that complements your home’s architecture while providing a reliable gathering place season after season.

Stone Fire Pit

2. Gas Fire Pits

For homeowners who want warmth without the upkeep, a gas built-in fire pit offers instant ambiance at the flip of a switch. This clean, modern option is perfect for low-maintenance outdoor living, eliminating the need to store wood or manage ashes.

Gas fire pits can be incorporated into columns, walls, or custom tables as part of a hardscape design-build project, giving you flexibility in both form and function. They’re also an excellent choice for consistent heat output and ease of use, making them a practical yet stylish addition to your backyard.

Gas Fire Pit

3. Fire Pit Tables

A fire pit table combines the warmth of a flame with the practicality of a surface for drinks or dining. This versatile option works exceptionally well in smaller patios where a larger built-in feature might feel overwhelming.

Available in both portable and built-in styles, fire pit tables can be tailored to match surrounding materials and finishes, ensuring they fit seamlessly with your space.

They add function without sacrificing style, making them a smart solution for outdoor areas that need to work hard in every season.

4. Sunken Fire Pits

A sunken fire pit creates an inviting, enclosed gathering area that feels cozy and protected. Lowering the seating area below ground level provides natural wind protection while adding a dramatic focal point to your backyard.

This style pairs beautifully with built-in seating walls or retaining features and works best as part of a larger landscape redesign. While it requires more planning and excavation than other styles, the end result is a unique, intimate space that draws people in and encourages lingering.

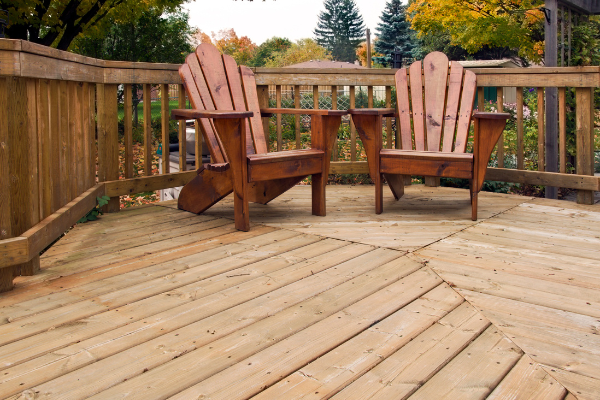
5. Fire Bowls & Portable Options

Fire bowls and other portable styles offer flexibility for those who want warmth and ambiance without committing to a permanent structure. They’re ideal for renters, smaller spaces, or anyone looking for a quick seasonal upgrade.

Many models are gas-powered or self-contained, making them easy to move, store, or reposition as your needs change.

With options ranging from sleek modern designs to rustic finishes, portable fire features can fit seamlessly into any outdoor setup.

6. Smokeless Inserts

Smokeless inserts are a smart upgrade for both new and existing fire pits, offering the warmth of a wood-burning fire without the heavy smoke.

Designed to improve airflow and burn efficiency, they create a more comfortable experience for guests and reduce lingering odors.

These inserts work with both wood and gas systems, making them a versatile choice for many backyard setups. As more homeowners look for clean-burning, low-maintenance solutions, smokeless designs are quickly becoming one of the most popular fire pit features.

Safety and Placement Tips

A fire pit can be a beautiful addition to your yard, but it needs to be installed and used with safety in mind. Keep these guidelines in mind:

  • Maintain distance from your home, fences, trees, and other flammable structures.
  • Consider wind direction when choosing the location to keep smoke away from seating areas.
  • Plan seating thoughtfully so guests can enjoy the warmth without sitting too close to the flames.
  • Follow local codes and permitting requirements before beginning any installation.
  • Hire a professional installer to ensure your fire pit is safe, durable, and built to last.

American Landscape Builds Fire Pits Tailored to Your Outdoor Living Needs

The right fire pit can extend your outdoor season, create a natural gathering spot, and enhance the overall appeal of your landscape. Our team designs and builds custom features that match your style, fit your space, and stand up to Wisconsin’s weather.

Are you considering adding a fire pit to your outdoor living space? Let American Landscape help you create a feature that brings warmth, style, and value to your home.

Contact our team today to get started.

Tips to Keep Your Landscape Thriving in August

ConeflowerFlower Care

  • Fertilize container plantings.
  • Deadhead flowers to encourage additional blooming.
  • Monitor for disease and insect problems and treat as needed.
  • Remove any slug-eaten leaves from hostas.
  • Cut back daylilies to 3-4″ to stimulate regrowth.
  • Check rhizomes for iris borer caterpillars.
  • Do not fertilize shrubs or roses after mid-August to discourage tender new growth before winter.

Pro Advice: Clear leaf debris from gardens to prevent breeding grounds for insects and fungal diseases!

Lawn mowing and trimmingLawn Maintenance

  • Mow as necessary. Raise mowing height to at least 3” as temperatures exceed 85˚F.
  • Water lawn adequately to keep it from going dormant. Deep (1” per week) and infrequent is preferred over frequent shallow waterings.
  • Scout for grubs. Peel back sod. More than 8 grubs per square foot can cause wilt or death of turf.
  • Establish or renovate turf by seed (late summer – early fall, depending on weather conditions). Prepare soil properly and get good seed to soil contact.

Tree Care by American Landscape Arborists

Trees & Shrub Care

  • Water newly planted trees and shrubs. Soak each plant well with the hose; sprinklers do not provide adequate water to encourage deep root growth.
  • Scout for fall webworm nest building near ends of branches.
  • Review health of trees and consider fall root feeding if necessary.

Tip! Don’t let weeds go to seed. “A year of seeding equals 7 years weeding.”

If keeping up with your landscaping chores feels overwhelming, reach out to learn more about our maintenance programs. (262) 252-4260

June Landscaping Checklist

June landscaping calls for paying attention to the watering and fertilizing needs of every element – flowers, trees/shrubs, and lawns. Be sure to review the complete June landscaping checklist to stay on top of the tasks needed in June to ensure your landscaping thrives all summer long.

Flowers

  • Continue planting annuals and vegetables.
  • Direct seed annuals and vegetables into the garden early in the month.
  • WATER! Annuals and veggies need regular water due to their shallow root systems. Remember that fewer, deeper waterings are more beneficial than frequent, shallow waterings.
  • Fertilize as needed. Perennial beds can use a slow-release fertilizer or can be fed along with annuals with a liquid like Miracle Gro. Vegetables can also be treated this way although many people have moved towards organic methods like compost to enrich the soil in the vegetable gardens.
  • Deadhead annuals and perennials for enhanced appearance and improved blooming.
  • Stake or trellis newly planted things like vines and tomatoes right away to avoid damaging the plant later.
  • Get on a regular weeding schedule. It’s easier to keep up a little at a time than to let things get out of control.

Lawn

  • Apply fertilizer and broadleaf weed control. 4-6 weeks after your prior application is best. Avoid using weed control on newly seeded areas.
  • Monitor for disease and insect problems and consult a professional if needed.
  • Keep grass cut at about 2 ½” to 3”. Cutting the grass shorter will allow more heat and light to penetrate to the roots causing stress. It also creates more openings for weeds to take hold.
  • Water as needed. Remember that fewer, deeper waterings will be more beneficial than frequent, shallow waterings. Lawns require about an inch of rain per week.
  • Newly seeded or sodded areas will require more water than an established lawn.

Trees/Shrubs  

  • Monitor for disease and insect problems and consult a professional if needed.
  • Prune spring blooming shrubs right after they are done blooming.
  • Trim boxwood, yews and other evergreens.
  • Fertilize roses and pre-treat with fungicide if they are prone to disease issues.
  • Trees and shrubs planted within the last year should be monitored for water. They will need it before your established plants do. If it’s hot and dry and we’re receiving less than an inch of rain per week, give them a good long drink.

Download Checklist

August Landscaping Guide

Peony Bush in a GardenFlower Care

  • Fertilize container plantings.
  • Deadhead flowers to encourage additional blooming.
  • Monitor for disease and insect problems and treat as needed.
  • Divide bearded iris. For healthy plants, these should be divided every 3 to 5 years.
  • Check rhizomes for iris borer caterpillars.
  • Do not fertilize shrubs or roses after mid-August to discourage tender new growth before winter.

someone trimming grassLawn Maintenance

  • Mow as necessary. Raise mowing height to at least 3” as temperatures exceed 85˚F.
  • Water lawn adequately to keep it from going dormant. Deep (1” per week) and infrequent is preferred over frequent shallow waterings.
  • Scout for grubs. Peel back sod. More than 8 grubs per square foot can cause wilt or death of turf.
  • Establish or renovate turf by seed (late summer – early fall, depending on weather conditions). Prepare soil properly and get good seed to soil contact.

Trees & Shrub Care

  • Water newly planted trees and shrubs. Soak each plant well with the hose; sprinklers do not provide adequate water to encourage deep root growth.
  • Scout for fall webworm nest building near ends of branches.
  • Review health of trees and consider fall root feeding if necessary.

Tip! Don’t let weeds go to seed. “A year of seeding equals 7 years weeding.”

If keeping up with your landscaping chores feels overwhelming, reach out to learn more about our maintenance programs. (262) 252-4260

30-Year Dream Backyard Becomes Reality

This project started off as a dream of the client’s late wife.  For years she had wanted to transform their backyard into a retreat.  After her passing our client felt a pressing need to bring this 30-year dream to life in memory of her.  

The backyard had major drainage and erosion issues.  The decaying timbers were becoming dangerous for the grandkids and the client’s dog.  There was no safe way to get down to the lower level of the yard and to the shed.  The client gave us an open slate as he felt he could not put a price on this memorial for his wife.  

The client’s requirements for the project included a water feature to minimize the noise of the freeway, replacing the walls, adding steps to make the lower level accessible, solving the major drainage issues, and bringing in color. 

Fieldstone was chosen for the walls to go with the natural design of the house.  The walls terrace the landscape to solve the erosion while creating multiple planting areas.  Lannon stone steps were installed to make a beautiful and safe transition to the multiple levels of this landscape.

We were challenged by narrow access to the yard because of the privacy fence, so we needed to remove fence panels to get into the yard.  The 5 cubic yard drywell was installed to mitigate the drainage issues in the lower level.  All drainage in the back yard comes to this area, and it handles it with ease.  


The basalt columns water feature was chosen for it’s natural appearance which blends in with the other features of the home and landscape.  The pond-less aspect was chosen to be child and dog friendly, as well as being low maintenance.  Landscape lighting brings this to life late into the evening and it can be viewed from multiple windows in the home.   

A hammock was added to this project so the client could enjoy afternoon naps and catch up on some reading.  It is the perfect location to enjoy the entire back yard while listening to the sound of water cascading down the centerpiece of this landscape.    

The plantings were chosen to be tough enough to handle the dog traffic and able to thrive with only having filtered sun due to the large overhead trees.  The mix of textures and newly installed sod give this lush backyard retreat its finishing touches.  

Do you have a dream in mind for your own landscape? Get in touch today to connect with one of our talented landscape designers. 262-252-4260

Paver Patio vs Wood Deck: Which is Best for You?


Everyone loves an inviting outdoor space for eating, entertaining, and relaxing. Deciding what kind of outdoor space to create calls for evaluating the location of the structure, the topography of your yard, budget, and of course the aesthetic you hope to achieve. One significant choice will be what kind of material you want to use for your outdoor space. Let’s take a look at some things to consider when deciding between wood vs hardscapes.

Will the outdoor space be raised or at ground level?

  • Wood decking is elevated and can sit a few inches to several feet above grade with supports. This may be ideal for second story decks or to accommodate sloping topography.
  • Paver patios are typically built at ground level. Since they require less structural support than wood, patios can be built next to your home, or elsewhere on your property to give you an inviting space to enjoy a garden, pool or fire pit.

Do you need to accommodate tricky topography?

Since paving is done at a ground level, sloped landscapes require construction of a raised foundation or small retaining wall. Patios can also be built with multiple layers to account for grade changes.  Decking, on the other hand, is elevated. It is a good solution for steeply sloping yards or yards with tricky topography.  Consider a deck & paver patio combination for homes with exposed basements.

For a ground-level construction, natural stone, concrete or clay pavers are a better option, providing a durable, long-term solution.

Do you want a low maintenance option?

A paved patio is by far a better option if you’re looking for a low maintenance feature. Once your pavers are installed, there is very little further maintenance required apart from the occasional hose down or quick replacement of an individual faulty paver. On the other hand, wooden decks require regular cleaning, staining, and replacement of rotten or worn deck boards.

Paver Patio    Wood Deck

Wooden decks have a shorter lifespan than paver patios. If not protected properly, wood is predisposed to rot, fungus and general decay. While regular maintenance can extend a deck’s lifetime, a paver patio definitely has the advantage when it comes to permanence.

Where will the patio be located and what look are you going for?

When choosing between these two materials, take a look at your overall landscape design and home and consider which one will blend in more naturally with the existing look and architecture. You should also consider the location to determine whether wood or stone is the right choice. For example, for poolside settings, the chlorine or salt used in pools can be damaging to wood, as can the high exposure to moisture. Pavers also offer a good choice when constructing a non-flammable area for a fire pit.

Pavers are perfect for fire pitsConcrete pavers often integrate better with other hardscaped outdoor elements, such as fire pits, steps, grill islands, and water features. If you’re looking to enhance the visual appearance of your landscape by adding these elements, pavers make a good match. Many people like the warmth and character offered by wood, while others prefer the timeless look of a natural stone or a paver product.

Pavers can replicate the look of wood and come in a variety of patterns and colors – giving homeowners flexibility to match the style of the property and integrate complementary colors in the hardscape.

Which is the most cost-effective option?

In the short-term, wood may be cheaper install. However, the following factors make paver patio the winner in the long-term:

  • Minimal annual upkeep
  • Easy to maintain
  • When professionally installed, repairs are typically limited to replacing individual pavers or installing new poly sand.
  • Long lifespan

Making the decision between the type of outdoor space you want for your home requires careful consideration of all the pros and cons. By thinking through the look you want, the placement of the structure, your short and long-term budget and the durability you seek, you won’t go wrong with whichever material you choose.

Our landscape designers are experts at selecting the right materials to complement your home and landscape. Call us today for help in selecting the right outdoor space for your home. 262-252-6240

Want to stay in the loop?
Sign up for our newsletter.

"*" indicates required fields

Name*
This field is for validation purposes and should be left unchanged.

American Landscape - 50 Years of Outstanding Landscaping Service to the Greater Milwaukee Area

(262)252-4260
info@amerlandscape.com

N60 W16073 Kohler Ln,
Menomonee Falls, WI 53051